Super Names
Users Manual
©2002 Stand Alone, Inc. All rights reserved.
Table of Contents
1.3.2. Entering the Registration Code. 5
1.4. Contacting Stand Alone, Inc.
3. Entering Address Book Information
3.2. Using the Address Edit Screen
3.3. Using field-editing Screens
3.3.2. Editing Existing Information
3.3.3. Accessing the Field Editing Screen Menus
3.3.4. Phones & E-Mail Addresses
3.3.8. Scrolling through Field Editing Screens
4.1. Linking a Name Card to an Appointment
4.2. Linking a Name Card to a To-Do Item
4.3. Linking a Name Card to a Memo Item
4.4. Linking Name Cards to Other Name Cards
4.5. Managing Links in the View
4.6. Managing Links in the List
5.4.2. Doing a Filtered Search
5.4.3. Doing a Full-Text Search
5.5. Using Name Card Categories
5.5.2. Filing Multiple Name Cards
5.5.3. Creating a New Category
5.5.4. Previewing the Contents of a Category
7. Beaming and Sending Information. 32
8.4.1. Configuring the Address Button. 37
9. Deleting Super Names Software
1.Welcome and Registration
Super Names provides advanced tools to organize Address Book information on Palm Powered™ handhelds.
1.1. Included Files
The archive includes the following files and folders:
|
File/Folder |
Purpose |
|
Readme.txt |
Explains how to register and order the software. |
|
SuperNames.prc |
Installs Super Names on your Palm Powered™ handheld. |
|
LinkLibrary.prc |
Installs additional software required to run Super Names. Do not attempt to use Super Names before installing this file. |
|
Order.html |
Automatically establishes link with Standalone, Inc. website. Places Super Names in your shopping cart. (If this does not happen automatically, click the Click to order link to go to our website.) |
|
License.txt |
Contains the software license agreement. Please read this before using the software. By installing, copying, or otherwise using this software, you agree to be bound by the terms of the license agreement. |
|
Manual |
Contains the HTML version of this manual. The images subfolder contains the graphics for this manual. |
Table 1 Super Names Files and Folders
1.2. System Requirements
Palm OS version 3.0 is required. Visit http://www.standalone.com/palmos/ to obtain an updated list of supported Palm Powered™ devices. This manual refers to any compatible device as a “Palm Powered™ handheld.”
Desktop address book software such as Microsoft Outlook or the Palm Desktop is required to synchronize Super Names with a desktop computer. Read your Palm Powered handheld documentation for procedures to set up this software.
1.3. Registering Super Names
Super Names is shareware, software that you can download and try for free. The time-limited demo version of Super Names includes all of the features available in the official version. After 30 days, the demo version will only work with a valid registration code.
There are several ways to order your registration code:
· Order online at our website. This is the easiest way to register. The online shopping cart uses security features that are supported by current Netscape or Internet Explorer browsers (version 4.0 or higher).
· E-mail your registration information to sales@standalone.com. We will send the registration code.
· Fax your order to us at (773) 477-2579.
1.3.1. Necessary Information
Have the following information ready before you register:
· Your exact name as it is entered in your Palm Powered™ handheld, including spaces.
· The complete list of programs that you wish to register.
· Payment information. We accept Visa, MasterCard, American Express, Discover and personal checks. To pay with a credit card, provide the card number, the expiration date, and the type of card.
· Contact information. Please provide an e-mail address, mailing address, and phone number.
1.3.2. Entering the Registration Code
Do the following to enter the registration code before the 30 day evaluation period has expired:
1. Open Super Names from the Applications menu. The start screen appears.
2. Select Options → Enter Registration Code from the menu. The Enter Reg Code screen containing a numerical keypad appears. The Name field shows your name as it is entered into your Palm Powered™ handheld.
3. Tap the numerical keypad to enter the registration code.
4. Tap the Register button.
Do the following to enter the registration code after the 30-day evaluation period has expired:
5. Open Super Names from the Applications menu. The registration information screen appears.
6. Tap Enter Registration. The Enter Reg Code screen containing a numerical keypad appears. The Name field shows your name as it is entered into your Palm Powered™ handheld.
7. Tap the numerical keypad to enter the registration code.
8. Tap the Register button.
If you have any questions about registration or our registration policy, please feel free to e-mail us at sales@standalone.com.
1.4. Contacting Stand Alone, Inc.
There are several ways to get in touch with us. E-mail is preferred. If you have any questions, comments, or suggestions, please do not hesitate to contact us.
1.4.1. Business Hours
Stand Alone is open from 9 AM to 5 PM Monday through Friday. We are closed on Saturday and Sunday. These times are CST and GMT -5.
1.4.2. E-mail
Internet: info@standalone.com
1.4.3. Fax
Fax: (773) 477-2579
1.4.4. Regular Mail
Stand Alone, Inc.
3862 N. Lincoln, Suite 2
Chicago IL, 60613
USA
1.4.5. World Wide Web
1.5. Customer Support
Please e-mail us at techsupport@standalone.com if you have problems starting or running Super Names. Include the following information to help us isolate and identify the problem:
- The type of Palm Powered™ handheld that you are using (example: Palm IIIx)
- The software name and version number. Select Options → About Super Names from the menu to view the software name and version number (example: Super Names for Palm OS®, version 2.0).
- Any error messages that accompany the problem.
- A brief description of how we can recreate the error.
- Your name and e-mail address.
2. Overview
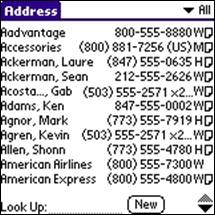
Your Palm Powered handheld has a built-in Address Book to keep names, addresses, phone numbers, and other contact information. Super Names adds powerful new features and an improved graphical interface to the built-in Address Book, enabling you to access and control your information more effectively.
|
Figure 1 Built-In Address Book |
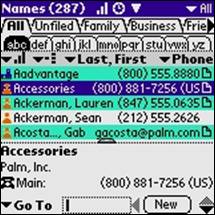
Figure 2 Super Names
|
Super Names works with your existing Address Book entries, and is backwards-compatible with all features of the built-in Address Book. (Table 2)
|
Address Book Task |
Built-In Address Book |
Super Names |
|
Look up or enter names, addresses, phone numbers and other information. |
þ |
þ |
|
Enter up to five phone numbers (home, work, fax, car, etc.) or e-mail addresses for each name. |
þ |
þ |
|
Define which phone numbers appear in the Address List screen for each entry. |
þ |
þ |
|
Attach a note to an entry. |
þ |
þ |
|
Categorize entries into logical groups that are easy to sort and view. |
þ |
þ |
|
Beam Address Book information to other Palm-Powered handhelds via the infra-red (IR) port. |
þ |
þ |
|
Rename Palm custom fields (4 fields). |
þ |
þ |
|
Synchronize with a desktop computer via HotSync. |
þ |
þ |
|
Dial a telephone number. |
þ |
þ |
|
Apply security settings to specific contacts. |
þ |
þ |
|
Fully customize the appearance of the address list. |
|
þ |
|
Do a filtered or full-text search. |
|
þ |
|
Add an unlimited number of additional fields (family members, dates, extra phone numbers, etc.). |
|
þ |
|
Link two items together. |
|
þ |
|
Assign color codes to Address Book entries. |
|
þ |
|
Group entries into intelligent collections. |
|
þ |
|
View individual fields without opening the full entry. |
|
þ |
|
Use third-party plug-ins. |
|
þ |
Table 2 Comparison of Built-In Address Book Tasks and Super Names Tasks
After installing Super Names you can still use the built-in Address Book. If you choose to uninstall Super Names, the contact information that you entered remains in the built-in Address Book.
2.1. Name Cards and Fields
In Super Names, an Address Book entry is called a name card. The information on a name card is made up of sections called fields.
2.1.1. Standard Fields
A standard field on a name card has a matching counterpart in the built-in Address Book. You can edit standard fields in Super Names, the built-in Address Book, or a desktop address book. The standard fields are:
· First Name
· Last Name
· Company Name
· Job Title
· Phone Number/E-mail (5 fields)
· Address
· City
· State
· Zip Code
· Country
· Custom Fields (4 fields)
· Notes
2.1.2. Additional Fields
Super Names enables you to add an unlimited number of additional fields to each name card. Additional fields have no exact matching counterparts in the built-in Address Book. Examples of additional fields are:
- Company Department
- Daughter’s Birthday
- Web Site
- Additional Phone Number/E-mail
Additional fields can be viewed in the Notes section of the built-in Address Book. In a HotSync operation, additional fields are written into the Notes section of entries in the desktop address book.
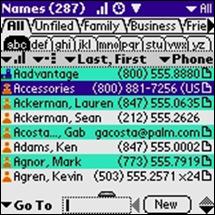
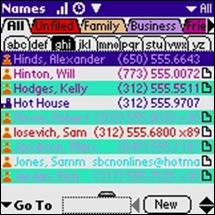
2.2. The List
Use the List window to look up name cards and skim contact information. (Figure 3)
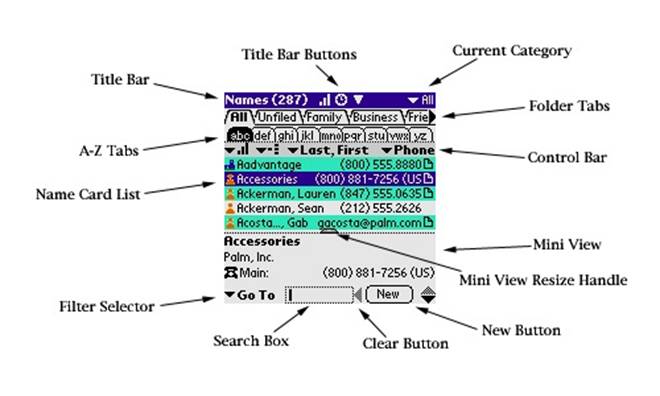
Figure 3 The List
The following table explains each of the List components.
|
Component |
Purpose / Action |
Comments |
|
Title Bar |
Tap Names to access the menu options. The number in parentheses shows the number of name cards in the currently selected category. |
|
|
Title Bar Buttons |
Tap title bar buttons to perform actions quickly without using menu pull-down options. |
Read Section 5.1, Using Title Bar Buttons. |
|
Current Category |
The selector shows the current category. Tap to select a different category. |
|
|
Folder Tabs |
Tap folder tabs to jump quickly between categories. |
The folder tab of the currently selected category appears in bold type. |
|
Control Bar |
Use the control bar tools to sort, group, and resize information in the name card list. |
Read Section 5.2, Using the Control Bar. |
|
Mini View |
This is a smaller version of the View Window. Tap any field in the Mini View to edit it. |
|
|
Mini View Handle |
Drag the handle to resize the Mini View. Drag the handle to the bottom of the screen to hide the Mini View. |
|
|
New Button |
Tap to create a new name card. |
|
|
Clear Button |
Tap to clear text in the search box. |
Enter a backspace character in the graffiti area to clear the entire search box. |
|
Search Box |
Do a basic, filtered, or full-text search for a name card. |
Read Section 5.4, Using the Search Box. |
|
Filter Selector |
Select Go To to do a basic search. Select a field name to do a filtered search. Select Text to do a full-text search. |
|
|
Name Card List |
Tap an item to show the full name card in the View. |
|
|
A-Z Tabs |
Tap a tab to jump to a different alphabetical section of the name card list. |
The A-Z tab of the current alphabetical section appears in bold type. |
Table 3 List Window Components
2.3. The View
Use the View window to view or edit the full details of a name card. (Figure 4)
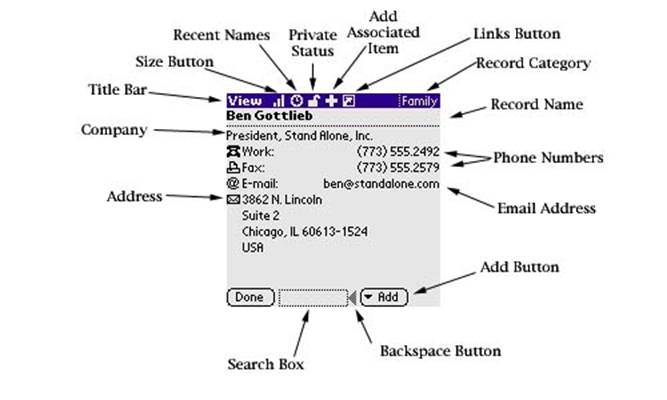
Figure 4 The View
The following table explains each of the View components.
|
Component |
Purpose |
Comments |
|
Title Bar |
Tap View to access the menu options. |
|
|
Size Button |
Tap to adjust the text size. |
|
|
Recent Names |
Tap to show a pull-down list of recently-viewed name cards. Select an item from the list to show in the View. |
|
|
Private Status |
A locked padlock icon indicates that the name card is private. An unlocked padlock icon indicates that the name card is not private. Tap the icon to change the private status. |
Read Section 6, Using Security Features. |
|
Add Associated Item |
Tap this button to link the name card to an item maintained by another application. The pull-down menu shows the available applications. The built-in Date Book and To-Do List always appear in the pull-down menu, enabling you to link name cards to appointments and to-do tasks. Third-party applications may add items to the popup list. |
Read Section 4.1 Linking a Name Card to an Appointment and Section 4.2, Linking a Name Card to a To-Do Item. |
|
Links Button |
Tapping this button pops up the link menu for the record. This menu enables you to create new links, and also displays all items currently linked to the record. |
|
|
Record Category |
Shows the category in which the name card is filed. Tap and select a different category to re-file the name card. |
Read Section 5.5, Using Name Card Categories. |
|
Record Name |
This is the contact’s name. If there is no first or last name in the record, then the company is displayed here. |
|
|
Phone Numbers |
Tap a phone number to edit it in the Phones & E-Mail Addresses field-editing screen. Tap the phone icon to dial the number, if your Palm Powered handheld supports telephone dialing. |
Read Section 3.3.4, Phones & E-Mail Addresses. |
|
E-mail Address |
Tap an e-mail address to edit it in the Phones & E-Mail Addresses field-editing screen. |
|
|
Add Button |
Tap to show a popup a list of items that can be added to the record. |
|
|
Backspace Button |
Tap to remove the last character entered into the search box. |
Enter a backspace character in the graffiti area to clear the entire search box. |
|
Search Box |
Enter the first few letters of a name to jump to a different name card. |
Read Section 5.4.1, Doing a Basic Search. |
|
Address |
This is the address associated with the contact. The first address is entered into the standard fields. An unlimited number of additional addresses can be added as additional fields. |
|
|
Company |
This is the company associated with the contact. |
|
Figure 5 View Window Components
3.Entering Address Book Information
Super Names provides several methods to manually enter contact information.
3.1. Entering a New Name Card
Do the following to enter a new name card:
- Tap the New button on the List screen. The Name screen appears.
- Enter the First and Last name.
- Tap Done. The new name card appears in the View with the first and last name in bold letters at the top of the window.
- Tap the Add selector. A popup list of field types appears. (Figure 6)
- Select a field type from the list. The corresponding field-editing screen appears.
- Enter the information into the field-editing screen.
- Tap Done to close the field-editing screen and return to the View.
- Repeat steps 4-7 until you finish entering the name card information.
- Tap Done to close the View and return to the List.
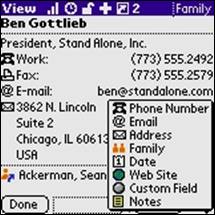
Figure 6 Add Selector Showing a Popup List of Field Types
3.2. Using the Address Edit Screen
The Address Edit screen provides an alternative interface that enables you to edit all of the standard fields on a single screen. (Figure 7)
To enter a new name card via the Address Edit screen:
- Tap the New button on the List screen. The Name screen appears.
- Enter the First and Last name.
- Tap Done. The new name card appears in the View with the first and last name in bold letters at the top of the window.
- Select
Record → Edit via List from the menu, or
enter
 E in the graffiti area. The Address
Edit screen appears.
E in the graffiti area. The Address
Edit screen appears. - Enter information into the desired fields.
- Tap Done.
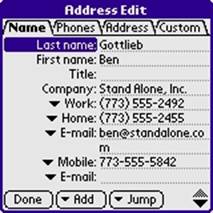
Figure 7 Address Edit Screen
Tap the tabs at the top of the Address Edit screen to move the cursor up or down to specific areas of the screen.
The Address Edit screen shows only standard fields. Use the Jump selector to access the additional fields. Use the Add selector to add additional fields if necessary.
3.3. Using field-editing Screens
Use the field-editing screens to quickly add or edit fields. (Table 4)
|
Field Editing Screen |
Field Icon |
Standard Fields |
Additional Fields |
Purpose |
|
Name |
|
First, Last |
|
Enter first and last name. |
|
Company Info |
|
Company, Title |
Department |
Enter company name, job title, and department. |
|
Phones & E-Mail Addresses |
|
Phone Number, Extension, E-mail Address
(5 fields) |
Phone Number, Extension, E-mail Address
(if added after 5 standard fields are filled) |
Enter:
Read Section 3.3.4, Phones & E-Mail Addresses. |
|
|
||||
|
|
||||
|
|
||||
|
Address |
|
Street, City, State, Zip Code, Country |
Additional Addresses |
Enter the mailing address. |
|
Family |
|
|
Numerous family and personal contact fields are available. |
Enter the names and birthdays of people who are important to the contact. (Read Section 3.3.5, Family Members) |
|
Date |
|
|
Date, Type, Description |
Enter important dates that pertain to the contact. (Read Section 3.3.6, Dates) |
|
Web Site |
|
|
Site, URL |
Enter the names and URLs of web sites related to the contact. |
|
Custom Field |
|
Custom Fields (4) |
|
Enter miscellaneous information. (Read Section 3.3.7, Custom Fields) |
|
Notes |
|
|
Notes |
Enter notes. |
Table 4 Fields and Field-Editing Screens
3.3.1. Adding New Fields
An Add selector appears in the View and in each of the field-editing screens.
To add a new field:
- Tap the Add selector. A popup list of field types appears.
- Tap the desired field-editing screen from the list. An empty field-editing screen appears.
- Add information to the editing screen.
- Tap Done.
3.3.2. Editing Existing Information
To edit an existing field:
- Tap a field in the View or the Mini View. A field-editing screen appears.
- Change the information in the field-editing screen.
- Tap Done.
Choose Record → Edit via List from the menu to edit standard fields in the Address Edit screen.
3.3.3. Accessing the Field Editing Screen Menus
Tap the title bar of a field-editing screen to access its Jump, Font, and Edit menus. (Figure 8)
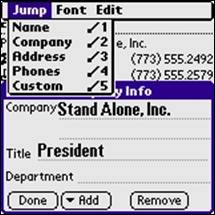
Figure 8 Field Editing Screen Menus
3.3.4. Phones & E-Mail Addresses
Use the Phones & Email Addresses screen to add or edit the phone numbers and e-mail addresses associated with a name card. The top half of the screen shows a list of phone numbers and e-mail addresses. Use the editing line in the bottom half of the screen to enter new information. (Figure 9)
To add a new phone number:
- Tap an Add selector from the View or a field-editing screen.
- Select Phone Number from the popup list. The Phones & Email Addresses screen appears with the cursor flashing on the editing line.
- Select the type of phone number from the pull-down selector (Work, Home, Mobile, etc.).
- Enter the phone number and extension.
- Tap Done.
To edit an existing phone number:
- Tap a phone number in the View. The Phones & Email Addresses screen appears with the number on the editing line.
- Change the number on the editing line.
- Select the type of phone number from the pull-down selector (Work, Home, Mobile, etc.).
- Tap the number again in the upper part of the screen to apply the changes.
If desired, check the Format number automatically checkbox to format the number according to the Phone Preferences setting. (Read Section 8.5, Phone Numbers)
Tap the + button to add a new number or e-mail address.
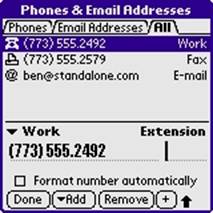
Figure 9 Phones & E-Mail Addresses Screen
The first five phone numbers or e-mail addresses added to a name card are standard fields. After the five standard fields are used, Super Names adds additional phone numbers and e-mail addresses as additional fields. Additional fields do not map to specific fields in your built-in Address Book or desktop address book.
3.3.5. Family Members
Use the Family screen to add the names and birthdays of family members (or other important people) to a name card.
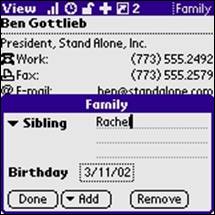
Figure 10 Family Screen
To add a family contact to a name card:
- Tap an Add selector from the View or a field-editing screen.
- Select Family from the popup list. The Family field-editing screen appears.
- Select the family member type from the selector. The selector shows Sibling by default.
- Select the birthday date from the Birthday selector.
- Tap Done.
The Birthday field does not link to your Date Book. To link a birthday to your Date Book, create a separate name card for the family member and add a Date field as explained in the next section
3.3.6. Dates
Use the Date screen to add dates to a Name Card and associate the dates with your built-in Date Book. Do the following:
- Tap an Add selector from the View or a field-editing screen.
- Select Date from the popup list. The Date field-editing screen appears.
- Select the date using the Date selector.
- Select the event type from the Type selector.
- If desired, enter a description in the Desc field.
- Check the Add to Date Book checkbox. The Annually checkbox appears to the right of it. (Figure 11)
- Check Annually for an annually recurring event.
- Tap Done.
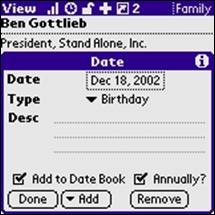
Figure 11 Date Screen
Leave the Add to Date Book checkbox unchecked to keep the date item separate from your Date Book.
3.3.7. Custom Fields
Use the Custom Fields screen to add or edit the custom fields.
It is helpful to define names for custom fields before entering information into them. Do the following:
- Choose Options → Preferences from the pull-down menu. The Preferences screen appears.
- Select Custom Fields from the pull-down selector. The list of four custom fields appears. (Figure 12)
- Replace the default names (Custom 1, Custom 2…) with specific names. (example: Account Number)
- Tap Done.
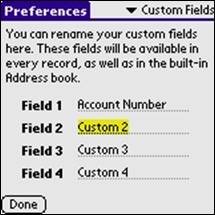
Figure 12 Custom Fields Preferences
Do the following to enter custom field information.
- From the View, tap the Add selector. A popup list of field-editing screens appears.
- Select Custom Field from the popup list. The Custom Fields editing screen appears. (Figure 13)
- Select the custom field from the Field selector.
- Enter the information in the text area.
- Repeat steps 3 and 4 to enter information into more custom fields.
- Tap Done.
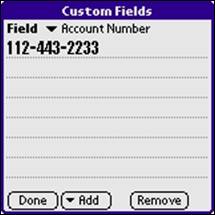
Figure 13 Custom Fields Screen
3.3.8. Scrolling through Field Editing Screens
Use the hardware scroll buttons to move between the following field-editing screens:
- Name
- Company Info
- Address
- Phones & E-Mail Addresses
For example, from the Name field-editing screen, press the down hardware scroll button to jump to the Company Info field-editing screen. Press the down hardware scroll button again to jump to the Address field-editing screen. In the Phones & E-Mail Addresses screen, the scroll buttons scroll up and down through the list of phone numbers and e-mail addresses.
3.4. Duplicating Name Cards
Use the Duplicate Record menu option to simplify the task of entering several name cards that share common information. Do the following to enter three new name cards for contacts who all work for “Company Z”:
Create a blank “Company Z” name card to use as a template:
- Tap the New button on the List screen. The Name screen appears.
- Tap Done without entering any names. The View screen appears.
- Tap the Add selector to see a list of available fields.
- Select Company from the list. The Company Info screen appears.
- Enter Company Z in the Company field.
- Tap the Add selector to see a list of available fields.
- Select Web Site from the list. The Website/URL Info screen appears.
- Enter the Site name and URL of Company Z.
- Tap Done.
The template card is now complete and you are ready to duplicate the card:
- Select Record → Duplicate Record from the menu to create a copy of the template card.
- Select Record → Duplicate Record from the menu again to create a second copy.
- Tap Done. The List appears containing three blank Company Z name cards.
- Edit each of these cards individually to fill in specific names, phone numbers, e-mail addresses, and other information.
If the template card already has a contact name, select Record → Duplicate w/o Name from the menu to create a copy that has empty Name fields.
4.Linking Name Cards
Super Names enables you to link name cards to appointments, to-do items, memos, and other name cards.
4.1. Linking a Name Card to an Appointment
Link the name cards of meeting attendees to the meeting appointment in your Date Book. This enables you to see the appointment when viewing the name card of an attendee.
To link a name card to a new appointment:
- Tap and hold a name card entry in the List. The action menu appears.
- Select New Appt. from the action menu. The Linked Appointment screen appears. (Figure 14)
- Enter the specifics of the new appointment.
- Tap Done. The new appointment is linked to the name card.
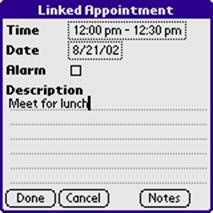
Figure 14 A Linked Appointment
To link a name card to an existing appointment:
- Tap a name card entry twice in the List to show it in the View.
- Tap
the link button (
 ) in the menu bar. The link pull-down menu
appears.
) in the menu bar. The link pull-down menu
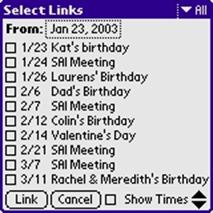
appears. - Select Add Date Links from the pull-down menu. The Select Links screen appears, showing a list of existing Date Book items.
- Check the Date Book item(s) that you want to link to the name card.
- Tap the Link button. Each of the checked Date Book items appears as a new link in the View.
4.2. Linking a Name Card to a To-Do Item
To link a name card to a new to-do item:
- Tap and hold a name card entry in the List. The action menu appears.
- Select New To Do from the action menu. The Linked To Do Item screen appears. (Figure 15)
- Enter the specifics of the to-do item.
- Tap Done. The to-do item is linked to the name card.

Figure 15 Linked To Do Item
To link a name card to an existing to-do item:
- Tap a name card entry twice in the List to show it in the View.
- Tap
the link button () in the menu bar. The link pull-down menu
appears.
- Select Add To Do Links from the pull-down menu. The Select Links screen appears, showing a list of existing to do items.
- Check the to do item(s) that you want to link to the name card.
- Tap the Link button. Each of the checked to do items appears as a new link in the View.
4.3. Linking a Name Card to a Memo Item
To link a name card to a memo item:
- Tap a name card entry twice in the List to show it in the View.
- Tap
the link button () in the menu bar. The link pull-down menu
appears.
- Select Add Memo Links from the pull-down menu. The Select Links screen appears, showing a list of existing memo items.
- Check the memo items that you want to link to the name card.
- Tap the Link button. Each of the checked memo items appears as a new link in the View.
NOTE: The Select Links screen will be empty if there are no existing memo items.
4.4. Linking Name Cards to Other Name Cards
Linking name cards together enables you to quickly jump back and forth between them. For example, you may want to link the name cards of contacts who work on the same project.
To link name cards:
- Tap a name card entry twice List to show it in the View.
- Tap
the link button () in the menu bar. The link pull-down menu
appears.
- Select Add Name Links from the pull-down menu. The Select Links screen appears, showing a checklist of name cards.
- Check the checkboxes of the name cards to link to.
- Tap the Link button. Each of the checked name cards appears as a new link in the View. Super Names also adds a link to each of the linked name cards that points back to the current name card.
4.5. Managing Links in the View
Tap the Link button in the View (![]() ) to access the
link pull-down menu.
) to access the
link pull-down menu.
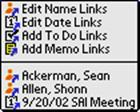
Figure 16 Link Pull-Down Menu
The top portion of the menu shows options to add new links to the name card. The bottom portion of the menu shows specific links that have already been added.
The general procedure to add new links from the View is as follows:
- Tap
the link button () in the menu bar. The link pull-down menu appears.
- Tap any of the options from the top portion of the link pull-down menu. The Select Links screen appears, showing a list of items that are available to be linked.
- Check the checkboxes of items that you want to link to the name card.
- Tap the Link button. Each of the checked items appears as a new link in the View.
|
Figure 17 Name Links |
Figure 18 Date Book Links |
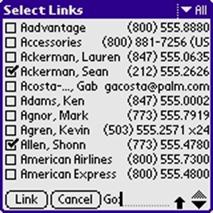
Tap the title bar of the Select Links screen to access the Links menu. Select Links → View Only Selected to show only the checked items. Select Links → Clear All Links to uncheck all of the checked items.
The View shows the links button and the link count in the title bar. The link count is the total number of links added to the name card. The View also shows link entries in the main display. (Figure 19)
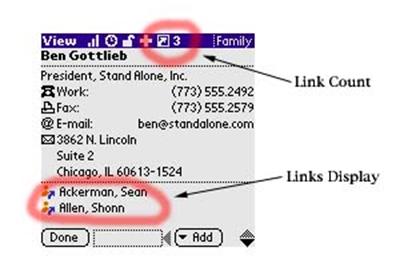
Figure 19 Links Count and Display
A link icon appears with each link entry. Tapping the icon shows a popup menu that enables you to follow, remove, or edit the link. (Table 5)
|
Link Icon |
Link Type |
|
|
Name |
|
|
Date |
|
|
To-Do |
|
|
Memo |
Table 5 Link Types
4.6. Managing Links in the List
If you use links frequently, configure the List to show a link indicator with each linked name card. Tap the link indicator to open the link pull-down menu for that name card. Section 8.1, List Preferences, explains how to show link indicators in the List.
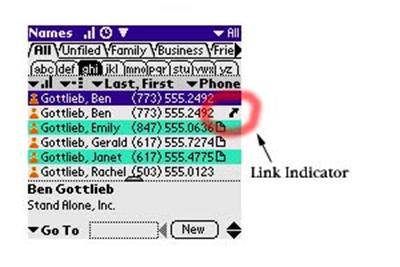
Figure 20 Link Indicator
5.Using List Features
This section explains how to use features and controls in the List window.
5.1. Using Title Bar Buttons
Use the title bar buttons to do frequently-performed actions with a single tap. (Table 6)
|
Title Bar Button |
Name |
Action |
|
|
Recently viewed names |
Show recently viewed name cards. |
|
|
Database sort order |
Sort the list by the specified field. |
|
|
Toggle controls |
Hide or show the control bar. |
|
|
Popup view options |
Hide or show elements that use space on the screen. |
|
|
Change display size |
Adjust the size of text in the list. |
|
|
Toggle A-Z tabs |
Hide or show A-Z tabs. |
|
|
Toggle Folder tabs |
Hide or show folder tabs. |
|
|
Group options |
Group name cards by name, company, city, etc. |
|
|
Databases |
Switch between databases. Read Section 8.9, Databases, for more information. |
Table 6 Title Bar Buttons
To add or remove buttons from the title bar:
- Choose Options → Preferences from the pull-down menu. The Preferences screen appears.
- Select Title Bar from the pull-down selector. The checklist of title bar buttons appears. (Figure 21)
- Check the checkboxes of buttons to add them to the Title Bar, or uncheck the checkboxes to remove them.
- Tap Done.
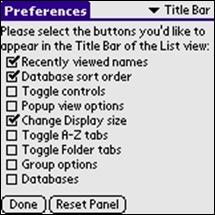
Figure 21 Checklist of Title Bar Buttons
5.2. Using the Control Bar
Use the control bar to control the appearance of the List.
|
Selector |
Action |
|
|
Adjust the size of text in the list. |
|
|
Group name cards by name, company, city, etc. |
|
Sort Selector |
Sort the list in ascending order by last name, first name, company, etc. |
|
Additional Field Selector |
Select a second field to show with each list entry. |
Table 7 Control Bar Selectors (from Left to Right)
5.3. Grouping Name Cards
Use the grouping control (![]() ) to group name cards. The List
creates a header for each group. Tap a header to view the name cards in
a group. Counters to the right of each header show the number of records within
each group.
) to group name cards. The List
creates a header for each group. Tap a header to view the name cards in
a group. Counters to the right of each header show the number of records within
each group.
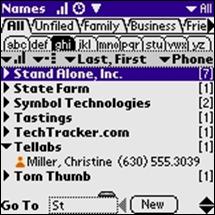
Figure 22 Grouped Name Cards
5.4. Using the Search Box
Super Names supports basic, filtered, and full-text name card searches.
5.4.1. Doing a Basic Search
A basic search depends on the sort order of the address list. For example, if the address list is sorted by last name, a basic search enables you to locate a name card by entering the first few letters of a last name.
To do a basic search:
- Make sure that the filter selector is set to Go To.
- Tap the stylus in the search box. A flashing cursor shows that the search box is ready to receive input.
- Enter the first few letters of the name you want to find. The List scrolls to the first name matching the letters.
5.4.2. Doing a Filtered Search
A filtered search targets a specific field. For example, use a filtered search to locate a name card by entering the first few digits of a zip code.
To do a filtered search:
- Select the target field from the filter selector. For example, select Zip to search the zip code fields.
- Tap the stylus in the search box. A flashing cursor shows that the search box is ready to receive input.
- Enter the first few letters or numbers of your search string via the graffiti pad. The List shows the entry(s) matching those letters or numbers.
5.4.3. Doing a Full-Text Search
A full-text search searches all of the fields on a name card.
To do a full-text search:
- Select Text from the filter selector.
- Tap the stylus in the search box. A flashing cursor shows that the search box is ready to receive input.
- Enter the first few letters or numbers of your search string via the graffiti pad. The List shows name cards that have those letters or numbers.
5.5. Using Name Card Categories
Super Names puts new name cards in the Unfiled and All categories. To categorize a name card, move it out of the Unfiled category and file it in a specific category such as Business or Personal.
The All category contains all of the name cards in the current database. The All category cannot be renamed or deleted. Super Names adds a QuickList category for convenience. The QuickList category can be renamed or deleted as desired.
5.5.1. Filing a Name Card
To file a name card in a category:
1. Tap a name card twice in the List to open it in the View.
2. Tap the record category selector in the upper right corner of the window. A pull-down list of categories appears.
3. Select the category in which to file the name card.
4. Tap Done.
5.5.2. Filing Multiple Name Cards
To file multiple cards in a category:
- Select
View → Toggle Checkboxes from the menu,
or enter X in the graffiti area. Checkboxes appear
next to items in the List.
- Check
the checkboxes of name cards to be filed.
 The file
folder icon appears in the tool bar.
The file
folder icon appears in the tool bar. - Tap the file folder icon. A popup list of categories
appears. (Figure 23)
- Select the desired category. The checked name cards are filed.
- Select View → Clear Selected from the menu to uncheck the checkboxes.
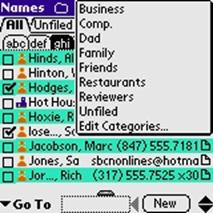
Figure 23 Popup List of Categories
5.5.3. Creating a New Category
To create a new category:
- Tap the category selector in the upper right corner of the List window. A pull-down menu of categories appears.
- Select Edit Categories… from the bottom of the pull-down menu. The Address Categories screen appears.
- Tap New. The Edit Categories dialog box appears.
- Enter the name of the new category.
- Tap OK. The new category appears in the list on the Address Categories screen.
- Tap OK.
5.5.4. Previewing the Contents of a Category
To preview the name cards in a category, tap and hold the category folder tab in the List. A popup list of name cards appears. Select a name card from the list to show it in the View. (Figure 24)
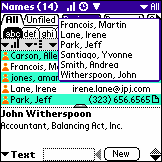
Figure 24 Popup List of Name Cards in a Category
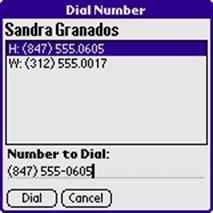
5.6. Dialing a Phone Number
To dial a phone number from the List:
- Tap a phone number in the right column in the List. A popup a list shows all phone numbers in the Name Card. (Figure 25)
- Select Dial via Dialog. The Dial Number screen appears. (Figure 26)
- Select the desired phone number.
- Tap Dial.

To dial a phone number from the View:
 Tap
the phone icon next to a phone number. A popup list shows the
dialing options.
Tap
the phone icon next to a phone number. A popup list shows the
dialing options.- Select
Dial Direct to dial the number next to the icon, or;
Select Dial via Dialog to select the number from the Dial Number screen.
NOTE: The phone dialing feature is deactivated if your Palm Powered handheld does not support it.
6.Using Security Features
|
|
Super Names enables you to protect individual name cards using the security features built into your Palm Powered handheld. You must assign a password to use this feature. The documentation for your Palm Powered handheld explains how to assign a password. |

To make a name card private:
- Open a name card in the View.
- Tap the open padlock icon in the title bar. The closed padlock icon appears, showing that the name card is now private.
To hide or mask all private name cards:
- From the List, select Options → Security from the pull-down menu. The Change Security dialog box appears.
- Select
Mask Records to block out private records with a grey bar in the List,
or;
Select Hide Records to hide private records from the List. - Tap OK.
To show all masked or hidden name cards:
- From the List, select Options → Security from the pull-down menu. The Change Security dialog box appears.
- Select Show Records. The Show Private Records dialog box appears.
- Enter your password.
- Tap OK.
7.Beaming and Sending Information
Super Names enables you beam information via the infra-red (IR) port, or send it to connected devices via Bluetooth™ networks.
To beam or send a name card from the List or the View:
- Tap a name card entry in the List. The entry becomes highlighted.
- Select Record → Beam Record or Record → Send Record from the main menu. The Beam or Send dialog appears and gives the status of the operation.
Select Record → Beam Category or Record → Send Category from the main menu to beam or send all of the name cards in the currently selected category.
To beam a name card from the List without using the main menu:
- Tap and hold a name card entry in the list. The action menu appears.
- Select Beam from the action menu. The Beam dialog appears and gives the status of the operation.
8.Configuring Preferences
Use the Preferences screen to customize the
appearance and behavior of the interface. To access the Preferences
screen, select Options → Preferences from the List
menu or enter ![]() R in the graffiti area.
R in the graffiti area.
Ten different panels make up the Preferences screen. Use the selector in the upper right-hand corner of the screen to select the desired panel. Tap the Reset Panel button to reset any panel to its default values.
The following subsections explain how to use each of the panels.
8.1. List Preferences
Use the List panel to control the appearance and behavior of the List Window. (Figure 27)
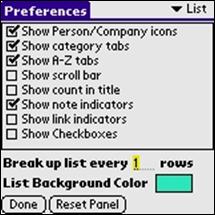
Figure 27 List Preferences
Check the checkboxes of screen elements to show in the List window. Uncheck the checkboxes of elements to hide.
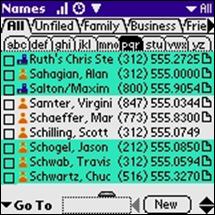
The Break up list every _ rows preference controls the alternating color pattern in the List. Increase the number to make the colors change less frequently. For example, increase the number to 3 to make the color alternate at every third row. (Figure 29)
|
Figure 28 Alternating Row Colors |
Figure 29 Colors Alternating at Every Third Row |
To change the alternating row color:
- Tap the List Background Color swatch. The color palette appears. (Figure 30)
- Tap the desired color on the palette.
- Tap Done.
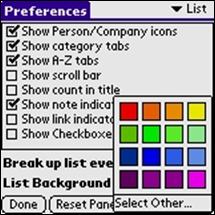
Figure 30 Color Palette
8.2. Editing Preferences
Use the Editing panel to define when the Address Edit screen appears and to determine the kind of timestamp information that is included with new name cards. (Figure 31)
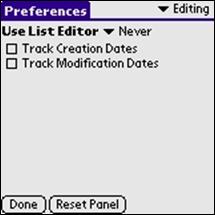
Figure 31 Editing Preferences
|
Preference |
Comments |
|
Use List Editor |
This determines when the Address Edit screen automatically appears. (Read Section 3.2, Using the Address Edit Screen.)
To show
the Address Edit screen manually, select Record → Edit
via List from the View menu, or enter |
|
Track Creation Dates |
Check this checkbox to add a date stamp to newly created name cards. |
|
Track Modification Dates |
Check this checkbox to add a Modified date stamp to newly created name cards. Super Names updates this date stamp to show when the name card was last modified. |
Table 8 Editing Preferences
8.3. Defaults
Use the Defaults panel to define the area code put in front of new phone numbers, and to define the default categories for viewing and filing name cards.
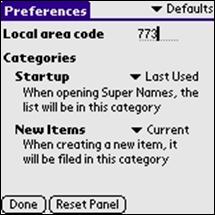
Figure 32 Defaults Preferences
If desired, specify the Local Area Code to automatically fill in each time a new phone number is created. Read Section 8.5, Phone Numbers, for more information about phone number preferences.
Use the Startup selector to select the category that will be open when you first open Super Names.
Use the New Items selector to select the category into which new name cards are filed. For example, select Business to automatically file all new name cards in the business category.
8.4. Miscellaneous
Use the Miscellaneous panel to control various Super Names features.
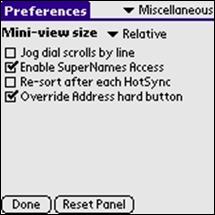
Figure 33 Miscellaneous Preferences
|
Preference |
Comments |
|
Mini-view size |
Select the size of the Mini-View in relation to the List window. Select Relative to scale the Mini-View in relation to the text size setting in the View. |
|
Jog dial scrolls by line |
This setting applies to handheld devices such as the Sony Clie™ that have a scroll wheel or “jog dial.” Check this checkbox to advance the display by a single line with each click of the scroll wheel. Leave this checkbox unchecked to advance the display by a full page with each click of the scroll wheel. |
|
Enable Super Names Access |
Check this checkbox to redirect operations from the built-in Address Book to Super Names. This enables built-in and third-party applications to jump directly to Super Names name cards, rather than to address entries in the built-in Address book. If you choose to uninstall Super Names, make sure that this checkbox is unchecked to allow your Palm Powered handheld to completely uninstall the software. |
|
Re-sort after each HotSync |
Check this checkbox to resort the Address Database after each HotSync operation. This is useful if you use a non-standard sort order, as the database may be resorted during a conventional HotSync operation. |
|
Override Address hard button |
Check this checkbox to configure the hardware address button to launch Super Names. Read the next section for more information. |
Table 9 Miscellaneous Preferences
8.4.1. Configuring the Address Button
The address button launches the built-in Address Book by default. You can configure it to launch Super Names. (Figure 34)

Figure 34 Address Button
After installing Super Names, a screen appears asking if you want to be able to launch Super Names by pressing the Address button. (Figure 35)
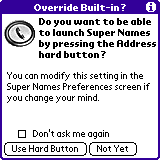
Figure 35 Address Button Confirmation Screen
Tap Use Hard Button to configure the address button to launch Super Names.
Tap Not Yet to keep the button’s default association with the built-in Address Book.
To reconfigure the button later, do the following:
- Choose Options → Preferences from the pull-down menu within Super Names. The Preferences screen appears.
- Select Miscellaneous from the pull-down selector. The checklist of miscellaneous preferences appears.
- Check the Override Address hard button checkbox to configure the address button to launch Super Names, or uncheck this checkbox to restore the button’s default association with the built-in Address Book.
- Tap Done.
8.5. Phone Numbers
Use the Phone Numbers panel to control the format of phone numbers. (Figure 36)
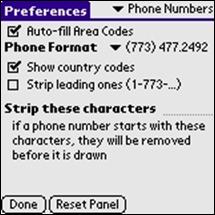
Figure 36 Phone Numbers Preferences
|
Preference |
Comments |
|
Auto-fill Area Codes |
Check this checkbox to automatically fill in area codes in front of new phone numbers. Super Names automatically fills in the area code of the first phone number entered in the name card. If no phone numbers have been entered, Super Names automatically fills in the default area code entered in the Defaults panel. |
|
Phone Format |
Select the preferred phone number format from the selector. |
|
Show country codes |
Uncheck this checkbox to hide country codes (+43, for example) in the List window. |
|
Strip leading ones |
Uncheck this checkbox to hide any 1’s that appear at the beginning of U.S. ten-digit phone numbers. |
|
Strip these characters |
If a large number of your Phone numbers share a common sequence of characters, you may want to hide the sequence to make room for other kinds of information. Enter the sequence into this field to remove it from the List display. |
Table 10 Phone Number Preferences
8.6. Categories
Use the Categories panel to configure the appearance of name card categories. (Figure 37)
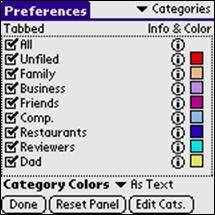
Figure 37 Categories Preferences
Categories with a checkmark appear as folder tabs in the List. Uncheck a category to hide its folder tab. Re-arrange the order of the folder tabs by dragging-and-dropping the categories in this panel.
To change a category color:
- Use the Category Colors selector to select the visual elements that you want to color. Color swatches appear next to the categories in the checklist.
- Tap a color swatch next to a category. The color palette appears.
- Tap the desired color to apply it to the category.
- Tap Done. Note that the new color is applied to the category folder tab and name card entries in the List.
The Category Colors selector enables you apply colors in three different ways: As Text, As Background, and White on Dark. White on Dark results in white text set against the selected background colors.
|
Figure 38 Color Preferences Affecting Text |
Figure 39 Color Preferences Affecting Background |

Tap the i button next to a category to open the Category Details screen and set various display and sort options for that category. (Figure 40)
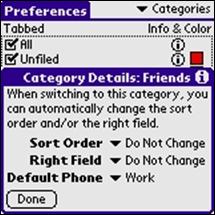
Figure 40 Category Details Screen
|
Preference |
Comments |
|
Sort Order |
Use this selector to select an alternative sort order for name cards filed in the category. |
|
Right Field |
Use this selector to select the second field that appears with name cards filed in the category. The second field appears to the right of the screen in the List. |
|
Default Phone |
Use this selector to define the default phone number type for new cards created in the category. For example, choose Work for name cards in the Business category. |
Table 11 Category Details
8.7. Custom Fields
Use the Custom Fields panel to rename the custom fields. (Figure 41)
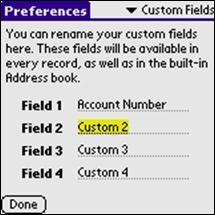
Figure 41 Custom Fields Preferences
Read Section 3.3.7, Custom Fields for procedures to add and edit custom fields.
8.8. Other Apps
Use the Other Apps panel to specify the Palm applications that are launched by tapping name card links. For example, tapping a Date Book link typically opens the built-in Date Book. Use the Date Links selector to use an alternative date book application, such as DateMan™.
The Link Library Version field shows the version of the LinkLibrary.prc that was installed.
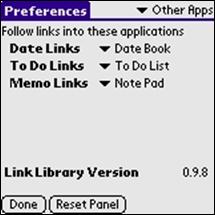
Figure 42 Other Apps Preferences
8.9. Databases
For advanced users only.
Use the Databases panel to create additional databases, each with its own set of categories and records. (Figure 43)
Use the Current Database selector to select the database currently opened in Super Names. Performing a HotSync operation backs up the current database.
Do not attempt to HotSync different Super Names databases with a single address book on your desktop computer. This may cause errors. It is recommended that non-advanced users always leave the Current Database set to Primary Address Database.
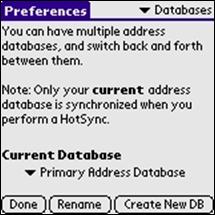
Figure 43 Databases Preferences
To create an additional database:
- Tap the Create New DB button. The Database Name screen appears.
- Enter a name for the new database.
- Tap the Create button.
There is currently no way to synchronize multiple databases to one desktop computer.
9.Deleting Super Names Software
IMPORTANT: Disable Super Names Access™ before deleting Super Names. This allows your Palm Powered handheld to completely delete the software.
Do the following to disable Super Names Access:
- Select
Options → Preferences from the pull-down menu,
or enter R in the graffiti area. The Preferences
screen appears.
- Choose Miscellaneous from the category selector. The miscellaneous preferences checklist appears.
- Uncheck Enable Super Names Access.
- Tap Done.
Use the standard procedure to delete Super Names from your Palm Powered handheld:
- Tap the Applications button to the left of the graffiti pad. The applications screen appears.
- Select
App → Delete from the pull-down menu, or enter D in
the graffiti area. The Delete screen appears.
- Select Spr Names from the list of installed software.
- Tap Done.
10. Glossary
|
Term |
Definition |
|
Address Database |
The database that stores all of the name cards. The built-in Address Book and Super Names share this database, so the changes made in one application will be reflected in the other. Perform a HotSync operation to synchronize the database. |
|
A-Z Tabs |
Small folder tabs at the top of the List that let you jump to alphabetic sections of the name card list. Each successive tap jumps to the next letter on the tab; tapping abc once goes to the A’s, twice to the B’s, and the third time to the C’s. |
|
Built-In Address Book |
The Address Book application that comes with your Palm Powered handheld. It is in read-only memory (ROM), and cannot be deleted. |
|
Category |
Name cards can be filed into 15 user-defined categories. View the All category to view all categories at once. You cannot file the same name card into multiple user-defined categories. |
|
Default Fields |
These are the standard fields available in the built-in Address Book. They include first and last name, company and title, five phone number/emails, address, city, state, zip, country, and four custom fields. |
|
Folder Tabs |
Folder tabs at the top of the List that let you jump to different name card categories. |
|
Groups |
Grouping together similar items in the List enables you to access certain information more quickly. Name cards can be grouped according to the contents of a specific field, such as Company. |
|
Links |
Links tie one record to another. You can link a name card to another name card, an appointment, a to-do task, or a memo. Whenever you view that name card, you’ll see the records to which it is linked. |
|
List Window |
This is a list of all your Addresses on your Palm. You can jump from here to the View window. |
|
Menus |
To access the menu, tap the menu bar or the menu button in the lower left corner of the screen:
|
|
Mini View |
An area at the bottom the List that enables you to see the details of a name card without opening the View. |
|
Name Card |
The data record that holds all of the information about a contact: standard fields, additional fields, and links. |
|
Right Field |
This is the content of the right-hand column in the List window. The right field shows the contact’s phone number by default. |
|
Search Box |
Enables you to run a basic, filtered, or full-text search for information in the database. |
|
Super Names Access™ |
This feature redirects operations from the built-in Address Book to Super Names. This enables built-in and third-party applications to jump directly to Super Names name cards, rather than to the address entries in the built-in Address book. |
|
View Window |
Shows detailed information about a name card. |
Table 12 Definitions and Terms
HotSync, Palm Powered, and Palm OS are registered trademarks of Palm, Inc.