DateMan
Users Manual
©2004 Stand Alone, Inc. All rights reserved.
Table of Contents
1.3.2. Entering the Registration Code
1.4. Contacting Stand Alone, Inc.
2.4. Using DateMan with SuperNames
5. Entering Appointments and Events
5.1. Entering a Timed Appointment
5.2. Entering an Untimed Event
5.3. Entering a Multiday Event
5.4. Entering a Recurring Appointment
5.5. Entering a Recurring Event
5.7. Changing an Appointment, Event, or Task
5.8. Using the Appointment Pop-Up Menu
5.9. Entering or Changing Appointments Graphically
5.10. Entering Additional Details
5.12. Spotting Scheduling Conflicts
5.14.2. Associating an Icon with an Appointment
5.14.3. Associating a Color with an Appointment
6.1.1. Editing and Deleting Templates
7.1. Linking to an Address Book Contact
7.2. General Procedure for Managing Links
7.3. Linking to SuperNames Name Cards
10. Beaming and Sending Information
12. Configuring the Date Book Button
1.Welcome and Registration
DateMan provides advanced tools to organize Date Book and To Do List information on Palm Powered™ handhelds.
1.1. Included Files
The archive includes the following files and folders:
|
File/Folder |
Purpose |
|
Readme.txt |
Explains how to register and order the software. |
|
Dateman.prc |
Installs DateMan on your Palm Powered handheld. |
|
DMIcons.prc |
Installs icons that can be associated with appointments, events, and tasks in DateMan. |
|
LinkLibrary.prc |
Installs additional software required to run DateMan. Do not attempt to use DateMan before installing this file. |
|
Order.html |
Automatically establishes link with Standalone, Inc. website. Places DateMan in your shopping cart. (If this does not happen automatically, click the Click to order link to go to our website.) |
|
License.txt |
Contains the software license agreement. Please read this before using the software. By installing, copying, or otherwise using this software, you agree to be bound by the terms of the license agreement. |
|
Manual |
Contains the HTML version of this manual. The images subfolder contains the graphics for this manual. |
Table 1 DateMan Files and Folders
1.2. System Requirements
Palm OS version 3.0 is required. Visit http://www.standalone.com/palmos/ to obtain an updated list of supported Palm Powered devices. This manual refers to any compatible device as a “Palm Powered handheld.”
Desktop date book software such as Microsoft Outlook or the Palm Desktop is required to synchronize DateMan with a desktop computer. Read your Palm Powered handheld documentation for procedures to install this software.
1.3. Purchasing DateMan
DateMan is shareware, software that you can download and try for free. After 30 days, the software will only work with a valid registration code. There are several ways to order the registration code:
· Order online at our website. This is the easiest way to register. The online shopping cart uses security features that are supported by current Netscape or Internet Explorer browsers (version 4.0 or higher).
· E-mail your registration information to sales@standalone.com. We will send the registration code.
· Fax your order to us at (773) 477-2579.
The registered version of DateMan includes all of the features available in the demo version. Your purchase includes free upgrades to any future version of DateMan.
1.3.1. Necessary Information
Have the following information ready before you register:
· Your exact name as it is entered in your Palm Powered handheld, including spaces.
· The complete list of programs that you wish to register.
· Payment information. We accept Visa, MasterCard, American Express, Discover and personal checks. To pay with a credit card, provide the card number, the expiration date, and the type of card.
· Contact information. Please provide an e-mail date, mailing date, and phone number.
1.3.2. Entering the Registration Code
To enter the registration code before the 30 day evaluation period has expired:
1. Open DateMan from the Applications menu.
2. Select Options → Enter Registration Code from the menu. The Enter Reg Code screen containing a numerical keypad appears. The Name field shows your name as it is entered into your Palm Powered handheld.
3. Tap the numerical keypad to enter the registration code.
4. Tap the Register button.
To enter the registration code after the 30-day evaluation period has expired:
1. Open DateMan from the Applications menu. The registration information screen appears.
2. Tap Enter Registration. The Enter Reg Code screen containing a numerical keypad appears. The Name field shows your name as it is entered into your Palm Powered handheld.
3. Tap the numerical keypad to enter the registration code.
4. Tap the Register button.
If you have any questions about registration or our registration policy, please feel free to e-mail us at sales@standalone.com.
1.4. Contacting Stand Alone, Inc.
There are several ways to get in touch with us. E-mail is preferred. If you have any questions, comments, or suggestions, please do not hesitate to contact us.
1.4.1. E-mail
Internet: info@standalone.com
1.4.2. Fax
Fax: (773) 477-2579
1.4.3. Regular Mail
Stand Alone, Inc.
707 W. Junior Terrace, #2N
Chicago IL, 60613
USA
1.4.4. World Wide Web
1.5. Customer Support
Please e-mail us at techsupport@standalone.com if you have problems starting or running DateMan. Include the following information to help us isolate and identify the problem:
- The type of Palm Powered handheld that you are using (example: Palm IIIx)
- The software name and version number. Select Options → About DateMan from the menu to view the software name and version number (example: DateMan for Palm OS®, version 1.0b1).
- Any error messages that accompany the problem.
- A brief description of how we can recreate the error.
- Your name and e-mail date.
2. Overview
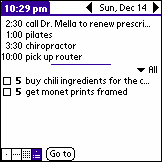
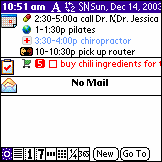
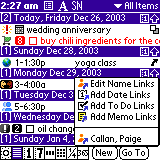
Your Palm Powered handheld has a built-in Date Book and a built-in To Do List to organize events and to do items. DateMan adds powerful new features and an improved graphical interface to these applications.
|
Figure 1 Built-In Date Book |
Figure 2 DateMan
|
2.1. Supported Features
DateMan adds many convenient features while remaining backwards-compatible with the built in Date Book and To Do List. (Table 2)
|
Task |
Built-In Date Book & To Do List |
DateMan |
|
Schedule a Timed or Untimed Event |
þ |
þ |
|
Schedule Repeating or Continuous Events |
þ |
þ |
|
Show Schedule by the Day, Week, or Month |
þ |
þ |
|
Use the Stylus Move Events within the Planner |
þ |
þ |
|
Set an Alarm for an Event |
þ |
þ |
|
Set Frequency and Duration of Alarm Sounds |
þ |
þ |
|
Launch Application by Pressing the Date Book Button |
þ |
þ |
|
Create a To Do List Item |
þ |
þ |
|
Set the Priority of a To Do List Item |
þ |
þ |
|
Check Off To Do List Items |
þ |
þ |
|
Put Events and Items into Categories |
þ |
þ |
|
Control the Appearance of the To Do List |
þ |
þ |
|
Show appointments and contact information on the same screen |
|
þ |
|
Color Code Appointments |
|
þ |
|
Associate Special Icons with Appointments |
|
þ |
|
Create New Appointments and Tasks from a Template |
|
þ |
|
Show a Quarterly or Yearly Schedule |
|
þ |
|
Show a Horizontal Timeline in the Day View |
|
þ |
|
Link Appointments to Tasks, Name Cards, or Memos |
|
þ |
Table 2 Comparison of Built-In Features and DateMan Features
After installing DateMan you can still use the built-in Date Book and To Do List. If you choose to uninstall DateMan, all events and to do items remain intact.
2.2. Standard Fields
Appointments, events, and tasks are made up of sections called fields. Standard fields are common to DateMan, the built-in Date Book, and desktop organizers. You can also beam standard fields to and from Palm handhelds that do not have DateMan. The standard fields are:
· Date
· Start Time
· End Time
· Description
· Alarm Switch
· Repeat
· Private
· Note
2.3. Additional Fields
Additional fields are available in DateMan, but not in the built in Date Book or To Do List. Additional fields include:
- Location
- Contact
- Phone Number/E-mail
- Links
Only DateMan can be used to enter information into additional fields.
2.4. Using DateMan with SuperNames
The Productivity Pack bundles DateMan with our address book product, SuperNames. Use these applications together to activate additional features, such as two-way links between appointments and contact information. Read Section 7.3, Linking to SuperNames Name Cards for procedures to create these links.
3.Viewing Appointments
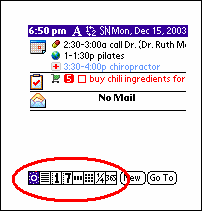
There are several ways to view your schedule in DateMan. Tap the view selector or push the Date Book button to switch between views.
|
Figure 3 View Selector
|
Figure 4 Date Book Button |
|
Selector Icon |
View |
Purpose |
Comments |
|
|
Today View |
Show the current day’s appointments and tasks. |
Tap the date in the menu bar to go to a different date. |
|
|
List View |
List all upcoming appointments and tasks by date. |
|
|
|
Day View |
Show appointments and tasks within an hourly planner. |
The top section of the screen shows events and tasks. The bottom portion of the screen shows appointments within a timetable.
Change the duration or start time of an appointment by tapping and dragging with the stylus. Read Section 5.9, Entering or Changing Appointments Graphically. |
|
|
Week View, Day Planner Style |
Show appointments and tasks for the current week. |
|
|
|
Week View, Classic Style |
Show appointments and tasks within a weekly planner. |
Drag items within the planner to reschedule them to a different day of the same week. |
|
|
Month View |
Show the month as a standard calendar. Icons identify appointments and tasks. |
|
|
|
Quarter View |
Show calendar across a three-month span. Show today’s appointments and tasks in an abbreviated format. |
|
|
|
Year View |
Show all months in the current year. |
|
Table 3 View Selector Buttons
Use the scroll buttons on the front panel of your handheld to move forward or backward through the views.
4.Using the Menu Bar
Menu bar buttons provide quick access to various features. (Figure 5)
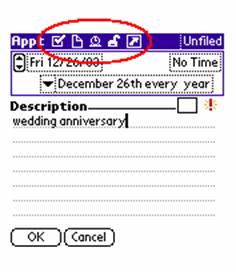
Figure 5 Menu Bar Buttons
|
Button |
Name |
Purpose |
Comments |
|
|
Links |
Add a link to the current appointment, event, or task. |
|
|
|
Two-line items |
Expand / condense entries between one and two line formats. |
|
|
|
Alarm Off / On |
Open Set Alarm screen. |
Read Section 5.15, Setting an Alarm. |
|
|
Additional Fields |
Add / remove location, contact, phone/E-mail, or Time Bar. |
|
|
|
Security Settings |
Add or remove privacy settings from an appointment, event, or task. |
Read Section 9, Using Security Features. |
|
|
Show / Hide Settings |
Show or hide information in the current view. |
|
|
|
Show appointment icons or clock icons |
Show Appointment Icons or Clock Icons in the Calendar View. |
|
|
|
Notes |
Add notes. |
A blank page icon indicates that no notes have been added. A page icon with lines indicates that notes have been added. |
|
|
Expand / Compress |
Expand or collapse appointment entries. |
|
|
|
Font |
Change font size. |
|
|
|
Multiday events. |
Tap to show or hide multiday events appearing in the Month View. |
|
|
|
SuperNames shortcut |
Open SuperNames. |
SuperNames must be installed. |
Table 4 Menu Bar Shortcuts
5.Entering Appointments and Events
This section explains how to enter different types of appointments and events.
|
Appointment / Event |
Description |
Examples |
|
Timed appointment |
Occurs once on a specific date. |
Doctor’s appointment. |
|
Untimed event |
Occurs once on a specific date. |
Project deadline. |
|
Multiday event |
Occurs over a series of consecutive dates. |
Business convention. |
|
Recurring appointment |
Occurs periodically. |
Yoga class. |
|
Recurring event |
Occurs periodically. |
Anniversary. |
|
Task |
An untimed or recurring event that includes a Complete checkbox and a numeric Priority. |
Pick up dry cleaning. Water plants.
|
Table 5 Types of Appointments and Events
5.1. Entering a Timed Appointment
To enter a timed appointment:
- Tap the New button. A pop-up menu appears.
- Tap Appointment on the pop-up menu. The appointment editing screen appears.
- Tap the date selector.(Figure 6) The Select a Date screen appears.
- Tap the desired month and day on the calendar. The appointment editing screen reappears with the selected date.
- Tap the time selector.(Figure 6) The Select a Time screen appears.
- Tap the Start Time box.
- Tap the start time within the hour and minute selectors.
- Tap the End Time box.
- Tap the end time within the hour and minute selectors.
- Tap OK. The appointment editing screen reappears with the selected time.
- Enter the Description.
- Tap OK. The appointment appears in the scheduler.
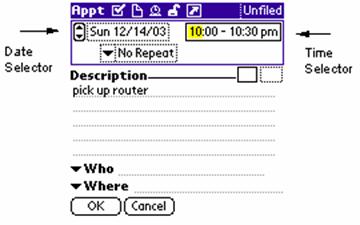
Figure 6 Date and Time Selectors
5.2. Entering an Untimed Event
To enter an untimed event:
- Tap the New button. A pop-up menu appears.
- Tap Event on the pop-up menu. The appointment editing screen appears.
- Tap the date selector.(Figure 6) A calendar screen appears.
- Tap the desired month and day on the calendar. The appointment editing screen reappears with the selected date.
- Enter the Description.
- Tap OK. The event appears in the scheduler.
5.3. Entering a Multiday Event
To enter a multiday event:
- Tap the New button. A pop-up menu appears.
- Tap Multiday Event on the pop-up menu. The appointment editing screen appears.
- Tap the date selector.(Figure 6) A calendar screen appears.
- Tap the desired month and starting day on the calendar. The appointment editing screen reappears with the selected date.
- Tap the ending date selector located immediately below the date selector. The Change Repeat screen appears.
- Tap the End On pulldown selector. A pull-down menu appears.
- Select Choose Date from the pull-down menu. The Select End Date screen appears.
- Tap the desired month and ending day on the calendar. The Change Repeat screen reappears.
- Tap OK. The appointment editing screen reappears with the selected end date.
- Enter the Description.
- Tap OK. The multiday event appears in the scheduler.
5.4. Entering a Recurring Appointment
The following example explains how to enter a recurring appointment for a business meeting that occurs at 10 AM on the first Monday of every third month. Modify parts of this procedure as necessary to enter different recurrence schemes.
- Tap the New button. A pop-up menu appears.
- Tap Appointment on the pop-up menu. The appointment editing screen appears.
- Tap the date selector. (Figure 6) The Select a Date screen appears.
- Tap the year and month in which the repeating appointment will first occur. In this case, the month and year is January, 2004.
- Tap the first Monday on the calendar. The appointment editing screen reappears with the selected date.
- Tap the time selector. (Figure 6) The Select a Time screen appears.
- Tap the Start Time box.
- Tap the start time within the hour and minute selectors.
- Tap the End Time box.
- Tap the end time within the hour and minute selectors.
- Tap OK. The appointment editing screen reappears with the selected time.
- Tap the repeat selector, directly on the words No
Repeat. The Change Repeat screen appears.
(If you tap the selector pull-down arrow and see a pop-up menu, select Other to open the Change Repeat screen.) - Tap Month.
- Enter 3 in the field labeled Every: __ Month(s)
- In the Repeat By selector, tap Day. The desired recurrence scheme appears as a sentence in the lower rectangle, The 1st Monday of every 3rd month. (Figure 7)
- Tap OK. The appointment editing screen appears showing the selected date, time, and recurrence scheme.
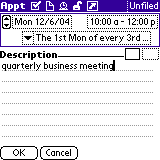
- Enter the Description. (Figure 8)
- Tap OK. The appointment appears in the scheduler.
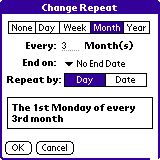
NOTE: If you did not get the desired result in step 16, tap Cancel and exit the Change Repeat screen. Verify that the date selector in the appointment editing screen is set to the desired date, and then reopen the Change Repeat screen.
5.5. Entering a Recurring Event
Do the following steps to enter a recurring event such as a wedding anniversary:
- Tap the New button. A pop-up menu appears.
- Tap Event on the pop-up menu. The appointment editing screen appears.
- Tap the date selector.(Figure 6) A calendar screen appears.
- Tap the month and day of the anniversary. The appointment editing screen reappears with the selected date.
- Tap the repeat selector directly on the words No Repeat.
The Change Repeat screen appears.
(If you tap the selector pull-down arrow and see a pop-up menu, select Other to open the Change Repeat screen.) - Tap Year. The desired recurrence setting appears as a sentence in the lower rectangle. (e.g. December 27th every year).
- Tap OK. The appointment editing screen appears showing the selected date, time, and recurrence scheme.
- Enter the Description.
- Tap OK. The anniversary appears in the scheduler.
5.6. Entering a Task
To add a task:
- Tap the New button. A pop-up menu appears.
- Tap To Do Task on the pop-up menu. The To Do editing screen appears.
- Tap the date selector. A pop-up menu shows several time intervals.
- Choose the amount of time to allocate to the task, or, to set a specific completion date for the task, tap Choose Date… from the pop-up menu and select the date from the calendar.
- Enter the Description.
- Select a numeric Priority from the pull-down selector.
- Associate an icon with the task if desired. (Read Section 5.14.2 , Associating an Icon with an Appointment.)
- Tap OK. The task appears in the scheduler.
To enter a recurring task, open a new task and then follow the same procedure for entering a recurring event. Read Section 5.5, Entering a Recurring Event.
To check off a task, tap its Complete checkbox. The Day Planner, List, Timed Day Planner, and Weekly Calendar all show this checkbox.
5.7. Changing an Appointment, Event, or Task
DateMan provides several methods to change the date, start time, duration, or recurrence settings of an appointment, event, or task. As a general rule, tap directly on the information that you want to change. Figure 9 shows where to tap to change parts of a yoga class appointment.

Figure 9 Sections of an Appointment in the List View
|
Figure # |
Action |
Comments |
|
1. |
Tap icon to show the Appointment Pop-Up Menu. |
Read Section 5.8, Using the Appointment Pop-Up Menu. |
|
2. |
Tap date to change date in the Select a Date screen. |
|
|
3. |
Tap time to change time in the Change Time… screen. |
|
|
4. |
Tap description to change description in the appointment editing screen. |
|
|
5. |
Tap recurrence icon to change recurrence settings. |
Read Section 5.4, Entering a Recurring Appointment. |
|
6. |
Tap links icon to add or remove links associated with the appointment. |
Read Section 7, Linking Data. |
Table 6 Sections of the Yoga Class Appointment in Figure 9
5.8. Using the Appointment Pop-Up Menu
Tap the icon of an appointment, event, or task to show the Appointment Pop-Up menu. (Figure 10)
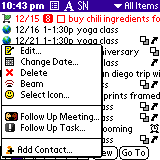
Figure 10 Appointment Pop-up Menu
|
Menu Item |
Action |
Comments |
|
Edit |
Open the appointment editing screen. |
|
|
Change Date |
Change date in the Select a Date screen. |
|
|
Delete |
Delete the appointment or event. |
|
|
Beam |
Beam the appointment or event via the infra-red (IR) port to another Palm handheld. |
Read Section 10, Beaming and Sending Information.
|
|
Select Icon |
Select a different icon. |
Read Section 5.14.2, Associating an Icon with an Appointment. |
|
Follow Up Meeting |
Schedule a follow-up meeting. |
Read Section 5.11, Scheduling Follow-Ups. |
|
Follow Up Task |
Schedule a follow-up task. |
|
|
Add Contact |
Add a SuperNames name card. |
Read Section 7.3, Linking to SuperNames Name Cards. |
Table 7 Appointment Pop-up Menu Items
5.9. Entering or Changing Appointments Graphically
In the Day View and the Classic Style Week View, tap and drag with the stylus to create or change appointments.
To change the start time of an appointment in Day View:
 Tap the Day View icon . The Day View
appears.
Tap the Day View icon . The Day View
appears.- Locate an appointment, such as a yoga class.
- Tap near the bottom of the white section of the appointment and drag up or down to shorten or lengthen the appointment.(Figure 11)
- Tap within the black header bar and drag up or down to move the appointment to a different time of the day.(Figure 11)
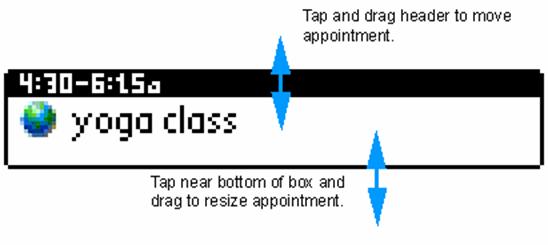
Figure 11 Changing an Appointment
To create a new appointment in the Day View:
- Tap and drag the stylus over empty time slots in the schedule. An empty appointment box appears.
- Tap the empty appointment box. The appointment editing screen appears.
- Enter the appointment Description.
- Tap OK.
5.10. Entering Additional Details
DateMan enables you to associate a location, contact, phone number, or e-mail address with any appointment, event, or task. To enter additional details:
- Locate the desired appointment, event, or task in one of the views and tap it with the stylus. The appointment editing screen appears.
- Tap the checkbox icon
 in the menu bar of the appointment
editing screen. A pop-up list appears.
in the menu bar of the appointment
editing screen. A pop-up list appears. - Select Show Location from the pop-up list. A field labeled Where appears at the bottom of the description area.
- Enter a location in the Where field.
- If desired, repeat the previous steps to add a contact, phone number, or e-mail address.
- Tap OK.
5.11. Scheduling Follow-Ups
If an appointment or event will occur at some future date with the same description, start time, or additional details, enter a follow-up appointment to avoid reentering information:
- Find the appointment or event on which the follow-up will be based.
- Tap the icon of the appointment with the stylus. The Appointment Pop-up menu appears.
- Tap Follow Up Meeting. The appointment editing screen appears with the desired description, date, and start time already entered.
- Adjust the date, start time, and additional information as desired.
- Tap OK.
5.12. Spotting Scheduling Conflicts
It is possible to schedule events that overlap. Use the Day View and the Week View to spot such conflicts.
The Day View shows overlapping appointments side-by-side. (Figure 12)

Figure 12 Conflicting Appointments in the Day View
The Week View shows overlapping appointments on top of each other. (Figure 13) Associate icons with appointments (Section 5.14) to make these conflicts easy to see.
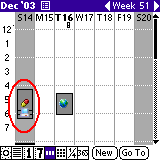
Figure 13 Conflicting Appointments in the Week View
5.13. Deleting an Appointment
To delete an appointment, event, or task:
- In any of the views, tap the icon of the appointment, event, or task. The Appointment Pop-Up Menu appears.
- Tap Delete. The Confirm Delete screen appears.
- Tap OK.
To delete an appointment or event in the appointment editing screen:
- Tap the menu bar or tap the Menu button on the left of the graffiti pad. The menu options appear.
- Select Delete. The Confirm Delete screen appears.
- Tap OK.
5.14. Using Icons and Colors
Icons and colors make it easy to see a large number of appointments and tasks at a glance. Icons are especially useful in the weekly and monthly views where many appointments and tasks appear in close proximity.
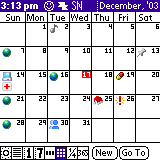
Figure 14 Icons in the Monthly Calendar View
5.14.1. Installing Icons
The DateMan installation package includes a file of icons. Visit www.standalone.com to download different icons.
5.14.2. Associating an Icon with an Appointment
To associate an icon with an appointment, do the following steps:
- Tap an appointment or event to open the editing screen.
- Tap the empty dotted square on the same line as Description at the left edge of the screen. A pop-up selector containing numerous icons appears.
- Tap the icon to associate with the appointment or event. The icon appears in the empty square.
- Tap OK.
DateMan automatically associates the chosen icon with all instances of a recurring appointment or event.
5.14.3. Associating a Color with an Appointment
To associate a color with an appointment:
- Tap an appointment or event to open the editing screen.
- Tap the first empty square to the right of the Description label. A pop-up selector containing different color choices appears.
- Tap the desired color. The color appears in the square.
- Tap OK.
DateMan applies the selected color to fonts and graphical aspects of the appointment.
5.15. Setting an Alarm
Use alarms as reminders of upcoming appointments. To set an alarm for an appointment:
- Locate the appointment in one of the views and tap it with the stylus. The appointment editing screen appears.
- Tap the inactive alarm icon
 in the menu bar of the appointment
editing screen. The Set Alarm dialog appears.
in the menu bar of the appointment
editing screen. The Set Alarm dialog appears. - Check the Alarm checkbox. A time selector appears.
- Select Minutes, Hours, or Days from the pull-down selector to begin specifying the time duration between the alarm sound and the start time of the appointment.
- Enter the number of minutes, hours, or days.
- Tap Set. The active alarm icon
 appears in the menu
bar. The alarm is set.
appears in the menu
bar. The alarm is set. - Tap OK to exit the appointment editing screen.
6.Using Templates
Templates simplify the creation of appointments, events, and tasks that occur frequently. To create a template for a sales presentation, for example, do the following steps:
- Select New → New Appt. Template from the menu. The Appointment editing screen appears with the menu bar items highlighted in red.
- Tap the date selector. The Select a Date screen appears.
- Tap the month and day of the first known sales meeting on the calendar. The appointment editing screen reappears with the selected date.
- Tap the time selector. The Select a Time screen appears.
- Tap the Start Time box.
- Tap the start time within the hour and minute selectors.
- Tap the End Time box.
- Tap the end time within the hour and minute selectors.
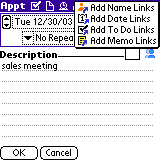
- Tap OK. The appointment editing screen reappears with the selected time.(Figure 15)
- Enter the Description.
- Associate an icon with the task. This example uses a bulls eye icon. (Read Section 5.14.2, Associating an Icon with an Appointment.)
- Add additional details, if desired. Read Section 5.10, Entering Additional Details.
- Tap OK. The appointment appears in the scheduler.
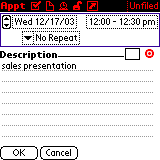
Figure 15 Appointment Template
The template is now available to create appointments for additional sales presentations. Tap New and notice that Sales Presentation is included as an option in the pop-up menu. (Figure 16)

Figure 16 Appointment Template in the Pop-up Menu
Tap the Sales Presentation menu item to enter a new appointment that already contains the desired icon and description.
6.1.1. Editing and Deleting Templates
Use the Available Templates screen to add, edit, or delete templates. To access this screen, choose New → Edit Templates… from the menu. (Figure 17)
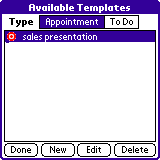
Figure 17 Available Templates Screen
Select the template and tap New, Edit, or Delete to make the desired changes.
7.Linking Data
DateMan enables you to link appointments, events, tasks, memos, and address book contacts.
7.1. Linking to an Address Book Contact
To link an appointment to a contact in the built-in address book:
- Locate the desired appointment in one of the views and tap it with the stylus. The appointment editing screen appears.
- Tap the link button
 in the menu bar. The link pull-down
menu appears.(Figure 18)
in the menu bar. The link pull-down
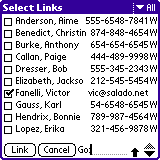
menu appears.(Figure 18) - Select Add Name Links from the pull-down menu. The Select Links screen appears, showing a checklist of address book contacts.(Figure 19)
- Check the checkboxes of the contacts to link to the appointment.
- Tap Link. The appointment editing screen reappears and a number corresponding to the number of linked contacts appears in the menu bar.
- Tap OK.
|
Figure 18 Link Pull-down Menu before Adding Link |
Figure 19 Select Links Screen |
Figure 20 Link Pull-down Menu after Adding Link |
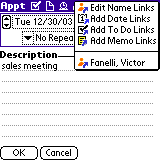
To open the linked contact information:
- Tap the link button again. The pull-down menu appears,
showing the contact name as a link. (Figure 20)
- Tap the link. The Address Book appears, showing the desired information.
- Return to DateMan via the Applications screen, if desired.
7.2. General Procedure for Managing Links
The general procedure to add links to an appointment, event, or task is as follows:
- Open the appointment, event, or task by tapping it in one of the views. The editing screen appears.
- Tap the link button in the menu bar. The link pull-down
menu appears.
- Tap any of the options from the top portion of the link pull-down menu. The Select Links screen appears, showing a list of items that are available to be linked.
- Check the checkboxes of items that you want to link to the appointment.
- Tap Link.
The top portion of the link pull-down menu shows options to add new links to the appointment. The bottom portion of the menu shows specific links that have already been added.
Tap the title bar of the Select Links screen to access the Links menu. Select Links → View Only Selected to show only the checked items. Select Links → Clear All Links to uncheck all of the checked items.
The editing screen shows the links button and the link count in the title bar. The link count is the total number of links added to the appointment. Certain views in DateMan also show links.
DateMan provides one-way links to data in built-in applications such as the Address Book and the Memo Pad. Return to DateMan via the Applications screen after following these links. Two-way links enable you to return directly to the opened appointment, event, or task without going through the Applications screen. DateMan provides two-way links to other appointments, events, and To Do items. If SuperNames is installed, DateMan also provides two-way links to personal contact information.
7.3. Linking to SuperNames Name Cards
SuperNames is a Stand Alone, Inc. application that enhances the functionality of the built-in address book. DateMan detects if SuperNames is installed, and enables entries in SuperNames, called name cards, to be linked to appointments, events, and To Do Items. Visit www.standalone.com to download and install SuperNames.
To link an appointment to a name card, follow the procedure given in Section 7.1, Linking to an Address Book Contact. This creates a two-way link between the appointment and the name card. (Figure 21)
|
Figure 21 Link from Appointment to Name Card |
Figure 22 Link from Name Card to Appointment |

Another method of associating a name card with an appointment is to tap the appointment icons in one of the views and select Add Contact from the Appointment pop-up menu.(Figure 23)
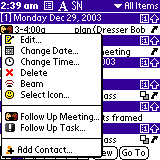
Figure 23 Add Contact Option in Appointment Pop-up Menu
8.Using Categories
Appointments, events, and tasks can be filed into categories. To create a new task and file it in the Business category:
1. Tap New. A pop-up menu appears.
2. Select To Do Task.
3. Enter the task. (Read Section 5.6, Entering a Task.)
4. Tap the category selector in the upper right corner of the To Do editing screen. A pop-up menu appears.
5. Tap Business.
6. Tap OK.
To create a custom category:
1. Tap the category selector. A pop-up menu appears.
2. Select Edit Categories … The Edit Categories screen appears.
3. Tap New. A dialog box appears and prompts for a new category name.
4. Enter the category name.
5. Tap OK. The new custom category appears in the list.
6. Tap OK.
In the List view, use the category selector to view the appointments, events, and tasks that are filed into specific categories.
9.Using Security Features
|
|
DateMan can protect appointments, events, and tasks using the security features built into your Palm Powered handheld. You must assign a password to use this feature. The documentation for your Palm Powered handheld explains how to assign a password. |

To make an appointment private:
- Open the appointment.
- Tap the open padlock icon in the title bar. The closed padlock icon appears, showing that the appointment is now private.
To hide all private appointments:
- From the List, select Options → Security from the pull-down menu. The Change Security dialog box appears.
- Select Mask Records to block out private records
with a grey bar in the List, or;
Select Hide Records to hide private records from the List. - Tap OK.
To show all hidden appointments:
- From the List, select Options → Security from the pull-down menu. The Change Security dialog box appears.
- Select Show Records. The Show Private Records dialog box appears.
- Enter your password.
- Tap OK.
10. Beaming and Sending Information
DateMan enables you beam information via the infra-red (IR) port, or send it to connected devices via Bluetooth™ networks.
To beam or send an appointment:
- Tap the appointment. The entry becomes highlighted.
- Select Record → Beam Record or Record → Send Record from the main menu. The Beam or Send dialog appears and gives the status of the operation.
To beam an appointment using the Appointment pop-up menu:
- Tap the icon of an appointment, event, or task. The appointment pop-up menu appears.
- Select Beam from the action menu. The Beam dialog appears and gives the status of the operation.
11. Configuring Preferences
To access the Preferences screen, select Options
→ Preferences from the menu or enter ![]() R in the graffiti
area. Several different panels make up the Preferences screen. Use the
selector in the upper right-hand corner of the screen to select the desired
panel. (Figure 24)
R in the graffiti
area. Several different panels make up the Preferences screen. Use the
selector in the upper right-hand corner of the screen to select the desired
panel. (Figure 24)

Figure 24 Preferences Pull-down Selector
Tap the Reset Panel button to reset any panel to its default values. Table 8 lists preferences that appear at the bottom of the first six panels.
|
Preference |
Purpose |
Comments |
|
Display Size |
Adjust the size of text in the view. |
|
|
Image |
Check this checkbox to use an image for the background rather than a solid color. |
|
|
Color |
Tap the blank square to select a different background color. |
|
|
Text |
Adjust the color of text in the view. |
|
Table 8 Common Preferences on first Six Panels
11.1. Today View
|
Figure 25 Today View Selector Button |
|
Preference |
Purpose |
Comments |
|
Show these panels |
Check the panels to show in the Today View. |
|
|
Show Phone # with Personal Info |
Show phone number with personal info panel. |
|
|
Show completed To Do tasks |
Show To Do tasks after you check them off. |
|
|
Don’t Show Default Icons |
Check to hide DateMan’s default icons. |
|
|
Show past items for today |
Check to show appointments that ended earlier that day. |
|
Table 9 Today View Preferences
11.2. List View
|
Figure 26 List View Selector Button |
|
Preference |
Purpose |
Comments |
|
Show alarm indicators |
Show or hide the alarm icon with appointments that have alarms. |
|
|
Show note indicators |
Show or hide a notes icon with appointments that have notes. |
|
|
Show link indicators |
Show or hide a links icon with appointments that have links. |
|
|
Show repeat indicators |
Show a special icon recurring appointments. |
|
|
Show To Do priorities |
Show or hide the numeric priority associated with a To Do Item. |
|
|
Show item icons |
Show or hide icons with To Do Items. |
|
|
Show Default Icons |
Show or hide DateMan’s default icons. |
|
|
Two lines per item |
Check to show two lines of information for each item in the List. Uncheck to show one line of information for each item in the list. |
|
|
Show colors as background |
Highlight the appointment with its associated color. |
Read Section 5.14.3, Associating a Color with an Appointment. |
|
Show appointment times |
Show start time of appointments. |
|
|
Show appointment durations |
Show start and stop time of appointments. |
This setting has no effect if Show appointment times is not checked. |
|
Show completed To Do tasks |
Show To Do tasks after you check them off. |
|
|
Show undated To Do tasks |
Show or hide To Do tasks. |
|
|
Show item counts in headers |
Show the number of appointments, events, and tasks on a given day. |
|
Table 10 List View Preferences
11.3. Day View
|
Figure 27 Day View Selector Button |
|
Preference |
Purpose |
Comments |
|
Show alarm indicators |
Show or hide the alarm icon with appointments that have alarms. |
|
|
Show note indicators |
Show or hide a notes icon with appointments that have notes. |
|
|
Show link indicators |
Show or hide a links icon with appointments that have links. |
|
|
Show repeat indicators |
Show a special icon recurring appointments. |
|
|
Show To Do priorities |
Show or hide the numeric priority associated with a To Do Item. |
|
|
Show item icons |
Show or hide icons with To Do Items. |
|
|
Show default icons |
Show or hide DateMan’s default icons. |
Default icons are built in to DateMan, not installed as a separate file. |
|
Show color as background |
Highlight the appointment with its associated color. |
Read Section 5.14.3, Associating a Color with an Appointment. |
|
Show completed To Do tasks |
Show To Do tasks after you check them off. |
|
|
Scroll a half day at a time |
Configure the Palm scroll buttons to move forward to backward through the Day View a half day at a time. |
Uncheck the checkbox to move forward or backward a full day at a time. |
|
Draw hour lines |
Show horizontal dotted lines at each hour mark. |
|
Table 11 Day View Preferences
11.4. Week View
|
Figure 28 Selector Button for Week View, Classic Style |
Figure 29 Selector Button for Week View, Day Planner Style |
|
Preference |
Purpose |
Comments |
|
Classic Style View |
||
|
Show item icons |
Show icons for appointments, events, and tasks. |
|
|
Background image |
Check to show the background image. |
|
|
Weekdays, Weekends |
Tap the squares to set the color of weekdays and weekends. |
|
|
Day Planner Style View |
||
|
Display Size |
Set the text size. |
|
|
Show day letters |
Show letters corresponding to the day of the week. |
|
Table 12 Week View Preferences
11.5. Month View
|
Figure 30 Month View Selector Button |
|
Preference |
Purpose |
Comments |
|
Show event banners |
Show banners that span the dates of multiday events. |
|
Table 13 Month View Preferences
11.6. Quarter / Year View
|
Figure 31 Quarter View Selector Button |
Figure 32 Year View Selector Button |
|
Preference |
Purpose |
Comments |
|
Quarter View |
||
|
Display Size |
Adjust the size of text in section of the Quarter View that shows the current day’s appointments, events, and tasks. |
|
|
Scroll by quarter (3 months) |
Check box to cause menu bar arrow buttons to scroll forwards and backwards in three month (quarter) increments. Uncheck box to cause menu bar arrow buttons to scroll in one month increments. |
|
|
Indicate day contents (slow) |
Underline each calendar date that contains an appointment, event, or task. |
DateMan accesses a large number of records to perform this function. This function may run slowly on older Palm handhelds. |
|
Year View |
||
|
Draw date numbers |
Check the checkbox to show numbers in the yearly calendar. Uncheck the checkbox to show blank squares in the yearly calendar. |
|
Table 14 Quarter / Year View Preferences
11.7. Alarms
|
Preference |
Purpose |
Comments |
|
Settings for selector |
Tap selector to configure the alarm settings for To Do Items or Appointments. |
Note that the alarm settings for To Do Items and Appointments are separate. Table 5 explains the differences between to do items and appointments. |
|
Alarm Preset |
Select the default time increment and lead time for alarms. |
If you frequently use the same time increment and lead time for alarms, check this checkbox and enter them here. This eliminates the need to re-enter the values when setting a new alarms. |
|
Alarm Sound |
Select alarm sound. |
|
|
Remind Me |
Select the number of times that the alarm can be turned off before it stops completely. |
|
|
Play Every |
Select the frequency of the alarm. |
|
|
Vibrate/Flash LED |
Turn on device-specific alarm features. |
|
|
Silent |
Turn off alarm sounds. |
|
Table 15 Alarms Preferences
11.8. Available Views
The Available Views panel shows the view selector. By default, all buttons are active and highlighted in blue. Tap the highlighted buttons to deactivate them. Tap Reset Panel to reactivate all of the buttons.
11.9. Day Detail
The Day Detail screen lists the appointments and events scheduled to occur on a selected date. It supplements the Week, Month, and Year Views where there is not enough screen space to access items directly. Tap a date square in any of these views to open the Day Detail screen.
|
Preference |
Purpose |
Comments |
|
Show alarm indicators |
Show or hide the alarm icon with appointments that have alarms. |
|
|
Show note indicators |
Show or hide a notes icon with appointments that have notes. |
|
|
Show link indicators |
Show or hide a links icon with appointments that have links. |
|
|
Show repeat indicators |
Show a special icon recurring appointments. |
|
|
Show To Do priorities |
Show or hide the numeric priority associated with a To Do Item. |
|
|
Show item icons |
Show or hide icons with To Do Items. |
|
|
Show default icons |
Show or hide DateMan’s default icons. |
Default icons are built in to DateMan, not installed as a separate file. |
|
Two lines per item |
Check to show two lines of information for each item in the List. Uncheck to show one line of information for each item in the list. |
|
|
Show colors as background |
Highlight the appointment with its associated color. |
Read Section 5.14.3, Associating a Color with an Appointment. |
|
Show appointment times |
Show start time of appointments. |
|
|
Show appointment durations |
Show start and stop time of appointments. |
This setting has no effect if Show appointment times is not checked. |
|
Show completed To Do tasks |
Show To Do tasks after you check them off. |
|
|
Show undated To Do tasks |
Show or hide To Do tasks. |
|
|
Show item counts in headers |
Show the number of appointments, events, and tasks on a given day. |
|
Table 16 Day Detail Preferences
11.10. Defaults
Use the selectors to choose default icons and colors for Appointments, Events, and To Do Tasks.
11.11. DM Access
DM Access enables DateMan to work with the Find and Alarm features of your Palm Powered handheld. Check the checkbox to turn on DM access. Do not delete DM Access in the Launcher. Uncheck the checkbox on this screen to deactivate DM access.
11.12. Fonts & Skins
Tap the font settings to change the font size DateMan uses in labels, headers, and body text.
Use the Skin and Background selectors to choose among skin and background files loaded onto the Palm handheld. Visit www.standalone.com to download skins and background files to customize the appearance of DateMan.
11.13. Start / Wake
Tap the view selector to choose the view that opens first when launching DateMan. If you want DateMan to open automatically after your Palm handheld has been turned off for some duration of time, choose the desired duration from the selector. The following section explains procedures to configure the date book button.
12. Configuring the Date Book Button
The date button launches the built-in Date Book by default. You can configure it to launch DateMan. (Figure 33)
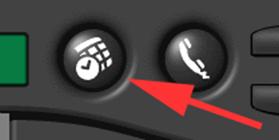
Figure 33 Date Book Button
After installing DateMan, a screen appears asking if you want to be able to launch DateMan by pressing the Date Book button. (Figure 34)
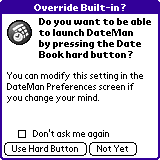
Figure 34 Date Button Confirmation Screen
Tap Use Hard Button to configure the date button to launch DateMan.
Tap Not Yet to keep the button’s default association with the built-in Date Book.
To reconfigure the button later, do the following:
- Choose Options → Preferences from the pull-down menu within DateMan. The Preferences screen appears.
- Select Start/Wake from the preferences selector. The Start/Wake preferences panel appears.
- Check the Override Date Book hard button checkbox to launch DateMan with the button, or uncheck this checkbox to restore the button’s default association with the built-in Date Book.
- Tap OK.
13. Deleting DateMan Software
IMPORTANT: Disable DateMan Access™ before deleting DateMan. This allows your Palm Powered handheld to completely delete the software.
Do the following to disable DateMan Access:
- Select Options → Preferences
from the pull-down menu, or enter
 R in the graffiti area. The Preferences
screen appears.
R in the graffiti area. The Preferences
screen appears. - Choose DM Access from the preferences selector. The DM Access panel appears.
- Ensure that Activate DM Access is not checked.
- Tap Done.
Use the standard procedure to delete DateMan from your Palm Powered handheld:
- Tap the Applications button to the left of the graffiti pad. The applications screen appears.
- Select App → Delete from the pull-down menu,
or enter D in the graffiti area. The Delete
screen appears.
- Select Spr Names from the list of installed software.
- Tap Done.
14. Glossary
|
Term |
Definition |
|
Additional Fields |
Fields that are available in DateMan, but not in the built-in Date Book or To Do List. |
|
Appointment |
A DateMan entry, such as a dinner date or recurring class that occurs on one or more specific dates, and has a specific start and end time. |
|
Date Book |
The Date Book application built into Palm Powered handhelds. |
|
Editing Screen |
The screen used to enter the details of an appointment, event, or task. The editing screen for appointments and events is titled Appt and the editing screen for To Do Tasks is titled To Do. |
|
Event |
The built-in date book refers to all of its entries as events. In DateMan, however, an event is an entry such as an anniversary or project deadline that occurs on one or more specific dates but does not have a specific start time. |
|
Field |
A placeholder for a piece of information within an appointment, event, or task. |
|
Follow-Up Appointment |
A new appointment or event that automatically contains has the same start time, description, or location as a previous appointment or event. Open follow-up appointments and events to avoid manually reentering information. |
|
Link Count |
The number of links added to an appointment, event, or to do task. The link count appears in the menu bar of the editing screen. |
|
Name Card |
An address book entry in SuperNames. |
|
Standard Fields |
Fields that are identical in DateMan and the built in Date Book or To Do List. Standard fields can be sent to, or received from devices that do not have DateMan. For example, standard fields are preserved when performing a HotSync procedure with a desktop computer, or when beaming information to a Palm handheld that is not running DateMan. |
|
SuperNames |
A Stand Alone, Inc. application that enhances the functionality of the built-in address book. |
|
Task |
An untimed event that includes a Complete checkbox and a numeric Priority. |
|
To Do List |
The To Do List application built into Palm Powered handhelds. |
Table 17 Definitions and Terms
HotSync, Palm Powered, and Palm OS are registered trademarks of Palm, Inc.